
Mastering RemoteIoT VPC Network On Raspberry Pi With Free AWS
Ever wondered how you can set up a remote IoT network on your Raspberry Pi using AWS for free? Well, buckle up, because we’re diving deep into the world of cloud computing, IoT, and all the tech wizardry that makes it possible.
RemoteIoT VPC network with Raspberry Pi and AWS is not just a buzzword; it's a game-changer for anyone looking to build scalable, secure, and cost-effective IoT solutions. Whether you're a hobbyist, a developer, or even a small business owner, this setup can revolutionize the way you manage devices and data.
Now, let’s be real—building a remote IoT network might sound intimidating at first. But fear not! We’ll break it down step by step, making sure you leave here feeling confident and ready to tackle this project head-on. So grab your favorite beverage, and let’s get started.
- Sadie Mckenna Onlyfans Leaks The Truth Behind The Controversy
- Megamovie The Ultimate Entertainment Experience Youve Been Waiting For
What Exactly is RemoteIoT VPC Network?
Let's start with the basics. A RemoteIoT VPC network refers to a virtual private cloud (VPC) environment that allows you to securely connect and manage IoT devices remotely. In simpler terms, it’s like creating a private playground in the cloud where your IoT devices can interact without exposing them to the public internet.
Using AWS, you can set up this VPC for free (within certain limits), which makes it an affordable option for beginners and small-scale projects. Plus, Raspberry Pi acts as the perfect little powerhouse to control and monitor your IoT devices from anywhere in the world.
Here’s why it’s so awesome:
- Vegamoviescom In Your Ultimate Destination For Movie Streaming
- Streaming 18 Movies Online A Comprehensive Guide For Adults
- It’s secure—your devices are protected within the VPC.
- It’s scalable—you can easily add more devices as your project grows.
- It’s cost-effective—AWS offers a free tier that covers most of what you’ll need for basic setups.
Why Use Raspberry Pi for RemoteIoT?
Raspberry Pi is like the Swiss Army knife of the tech world. It’s compact, affordable, and incredibly versatile. When it comes to setting up a RemoteIoT VPC network, Raspberry Pi serves as the perfect bridge between your physical devices and the cloud.
Here are a few reasons why Raspberry Pi is the go-to choice for this kind of setup:
- It’s lightweight and energy-efficient, making it ideal for long-term projects.
- It supports a wide range of sensors and peripherals, giving you endless possibilities for IoT applications.
- It runs on Linux, which means you can easily install and configure software for cloud integration.
Plus, with its vibrant community and tons of tutorials available, you’ll never feel stuck if something goes wrong.
Understanding AWS Free Tier
AWS Free Tier is like the ultimate starter pack for developers and hobbyists. It provides access to a range of AWS services, including EC2 instances, S3 storage, and VPC, all for free (within certain usage limits). For our RemoteIoT VPC network project, the free tier covers everything you need to get started.
Here’s what you get with AWS Free Tier:
- 750 hours per month of t2.micro EC2 instance usage.
- 15 GB of data transfer out per month.
- 5 GB of S3 storage.
These limits should be more than enough for most basic IoT setups, especially if you’re just experimenting or building a small-scale project.
Setting Up Your VPC on AWS
Now that you understand the basics, let’s dive into the setup process. Setting up a VPC on AWS might seem daunting, but trust me, it’s easier than you think.
Step 1: Create a VPC
Log in to your AWS account and navigate to the VPC dashboard. Click on “Create VPC” and fill in the necessary details. Make sure to choose a CIDR block that suits your needs—usually something like 10.0.0.0/16 works fine for most projects.
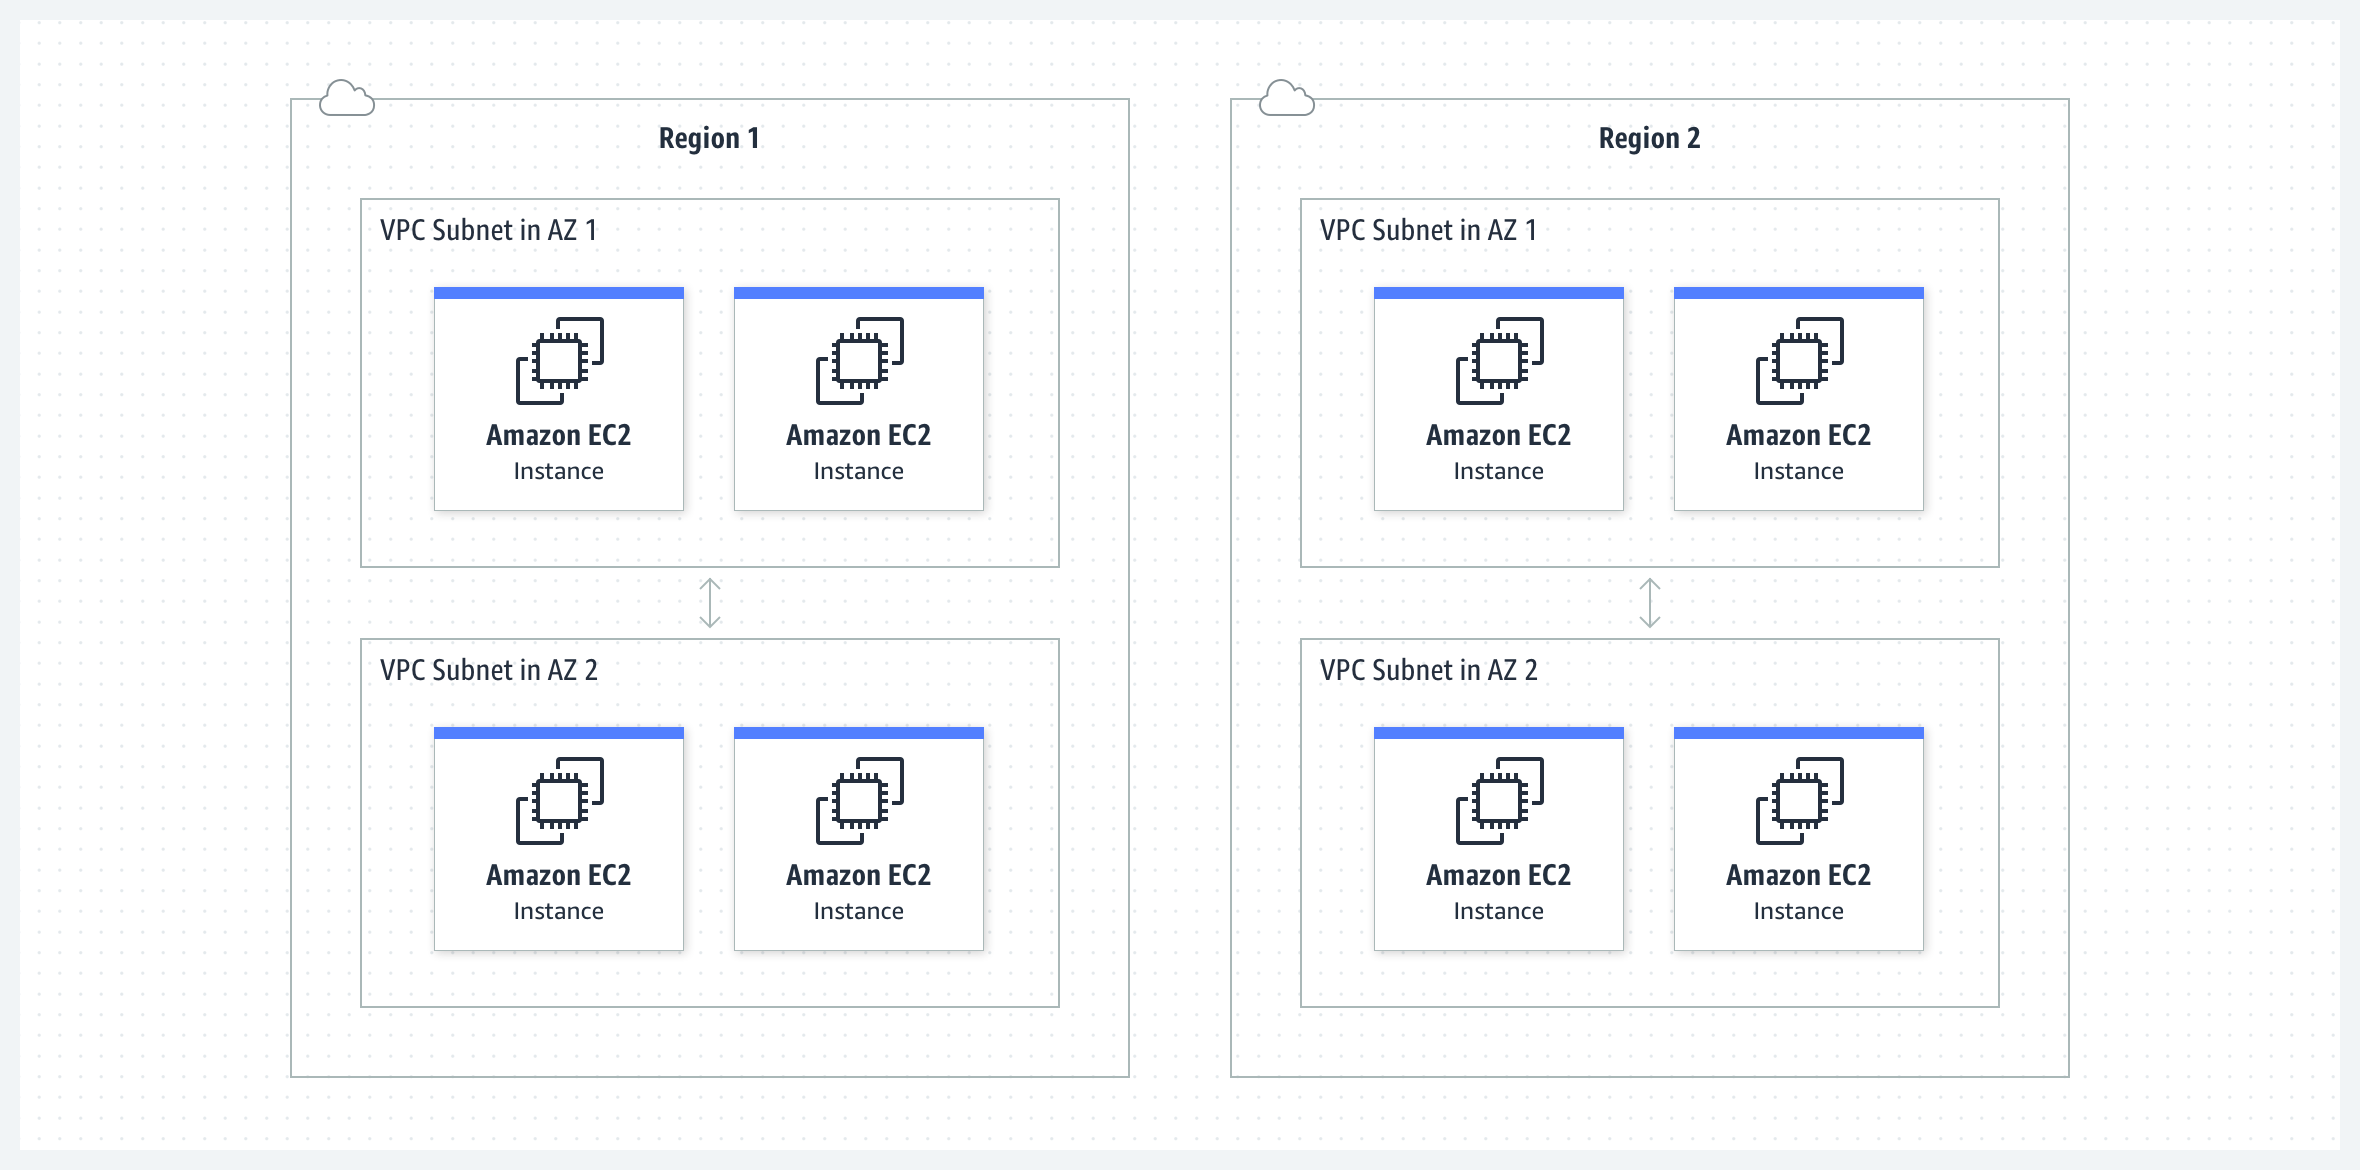
Step 2: Configure Subnets
Once your VPC is created, it’s time to set up subnets. Subnets allow you to divide your VPC into smaller segments, which can improve security and performance. You can create public and private subnets depending on your project requirements.
Step 3: Set Up Security Groups
Security groups act as virtual firewalls for your VPC. Configure them carefully to allow only the necessary traffic in and out of your network. For example, you might want to allow SSH access from your IP address to manage your Raspberry Pi remotely.
Connecting Raspberry Pi to AWS
With your VPC set up, it’s time to connect your Raspberry Pi to the cloud. Here’s how you can do it:
Step 1: Install Required Software
Make sure your Raspberry Pi is running the latest version of Raspberry Pi OS. Install any necessary software, such as AWS CLI, to facilitate communication with your VPC.
Step 2: Configure Network Settings
Set up your Raspberry Pi to connect to the internet through your VPC. This might involve configuring static IP addresses and routing rules to ensure seamless communication.
Step 3: Test the Connection
Once everything is configured, test the connection by trying to SSH into your Raspberry Pi from another device. If everything is set up correctly, you should be able to access your Pi securely through your VPC.
Building Your IoT Network
Now that your Raspberry Pi is connected to AWS, it’s time to start building your IoT network. Here are a few ideas to get you started:
- Create a home automation system to control lights, thermostats, and other devices.
- Set up a weather station to monitor temperature, humidity, and other environmental factors.
- Build a security system with motion sensors and cameras.
The possibilities are truly endless, and the best part is that you can scale your network as your needs grow.
Troubleshooting Common Issues
Even the best-laid plans can hit a snag or two. Here are some common issues you might encounter and how to fix them:
Issue 1: Unable to Connect to Raspberry Pi
Check your security group settings to ensure that the necessary ports are open. Also, verify that your Raspberry Pi’s network settings are configured correctly.
Issue 2: Slow Data Transfer
If you’re experiencing slow data transfer, consider optimizing your network settings or upgrading to a higher-tier EC2 instance if your project requires more resources.
Issue 3: Security Concerns
Always keep your software and firmware up to date to protect against potential vulnerabilities. Regularly review your security group rules and update them as needed.
Data Security and Privacy
When setting up a RemoteIoT VPC network, data security and privacy should always be a top priority. Here are a few tips to keep your network secure:
- Use strong passwords and enable two-factor authentication wherever possible.
- Regularly back up your data to prevent loss in case of a security breach.
- Limit access to your VPC to only those who absolutely need it.
By following these best practices, you can ensure that your IoT network remains safe and secure.
Future Trends in RemoteIoT
The world of IoT is evolving rapidly, and there are some exciting trends on the horizon that could impact your RemoteIoT VPC network setup. Here are a few to watch out for:
- Edge computing: This involves processing data closer to the source, reducing latency and improving performance.
- 5G connectivity: With faster and more reliable internet, IoT devices will become even more powerful and versatile.
- AI integration: Artificial intelligence can enhance the capabilities of IoT devices, enabling them to make smarter decisions.
Staying informed about these trends can help you future-proof your IoT projects and stay ahead of the curve.
Conclusion
Setting up a RemoteIoT VPC network on Raspberry Pi with free AWS is a fantastic way to explore the world of IoT and cloud computing. Not only does it provide a secure and scalable environment for your devices, but it’s also incredibly cost-effective thanks to AWS Free Tier.
Remember, the key to success is taking it one step at a time. Start small, learn as you go, and don’t be afraid to experiment. And most importantly, have fun!
So, what are you waiting for? Dive in and start building your very own RemoteIoT VPC network today. And when you’re done, don’t forget to share your experience in the comments below or check out our other articles for more tech tips and tricks.
Table of Contents
Article Recommendations
- Sadie Mckenna Onlyfans Leaks The Truth Behind The Controversy
- Somali Hub Telegram Your Ultimate Guide To Discovering The Vibrant Somali Community Online

Detail Author:
- Name : Jace Cassin
- Username : zstiedemann
- Email : edgardo87@hotmail.com
- Birthdate : 1987-11-10
- Address : 765 Marquardt Stravenue Suite 448 Marceloside, NC 36939-8682
- Phone : +1-859-297-4554
- Company : Fadel LLC
- Job : Sales Manager
- Bio : Culpa in adipisci consequatur reiciendis assumenda labore vero. Est omnis dolores repellendus dignissimos aperiam. Ut ex laudantium corrupti.
Socials
instagram:
- url : https://instagram.com/ceciliahaag
- username : ceciliahaag
- bio : Aut aspernatur quo enim laudantium. Provident amet fuga quis non veritatis tempora.
- followers : 2187
- following : 2904
linkedin:
- url : https://linkedin.com/in/haagc
- username : haagc
- bio : Nihil inventore sint dicta quisquam sit.
- followers : 502
- following : 1093
twitter:
- url : https://twitter.com/cecilia.haag
- username : cecilia.haag
- bio : Laboriosam fugiat autem maiores officia molestiae placeat. Pariatur aut repudiandae minima autem consequatur. Aperiam eos fugiat nihil.
- followers : 5464
- following : 1341