
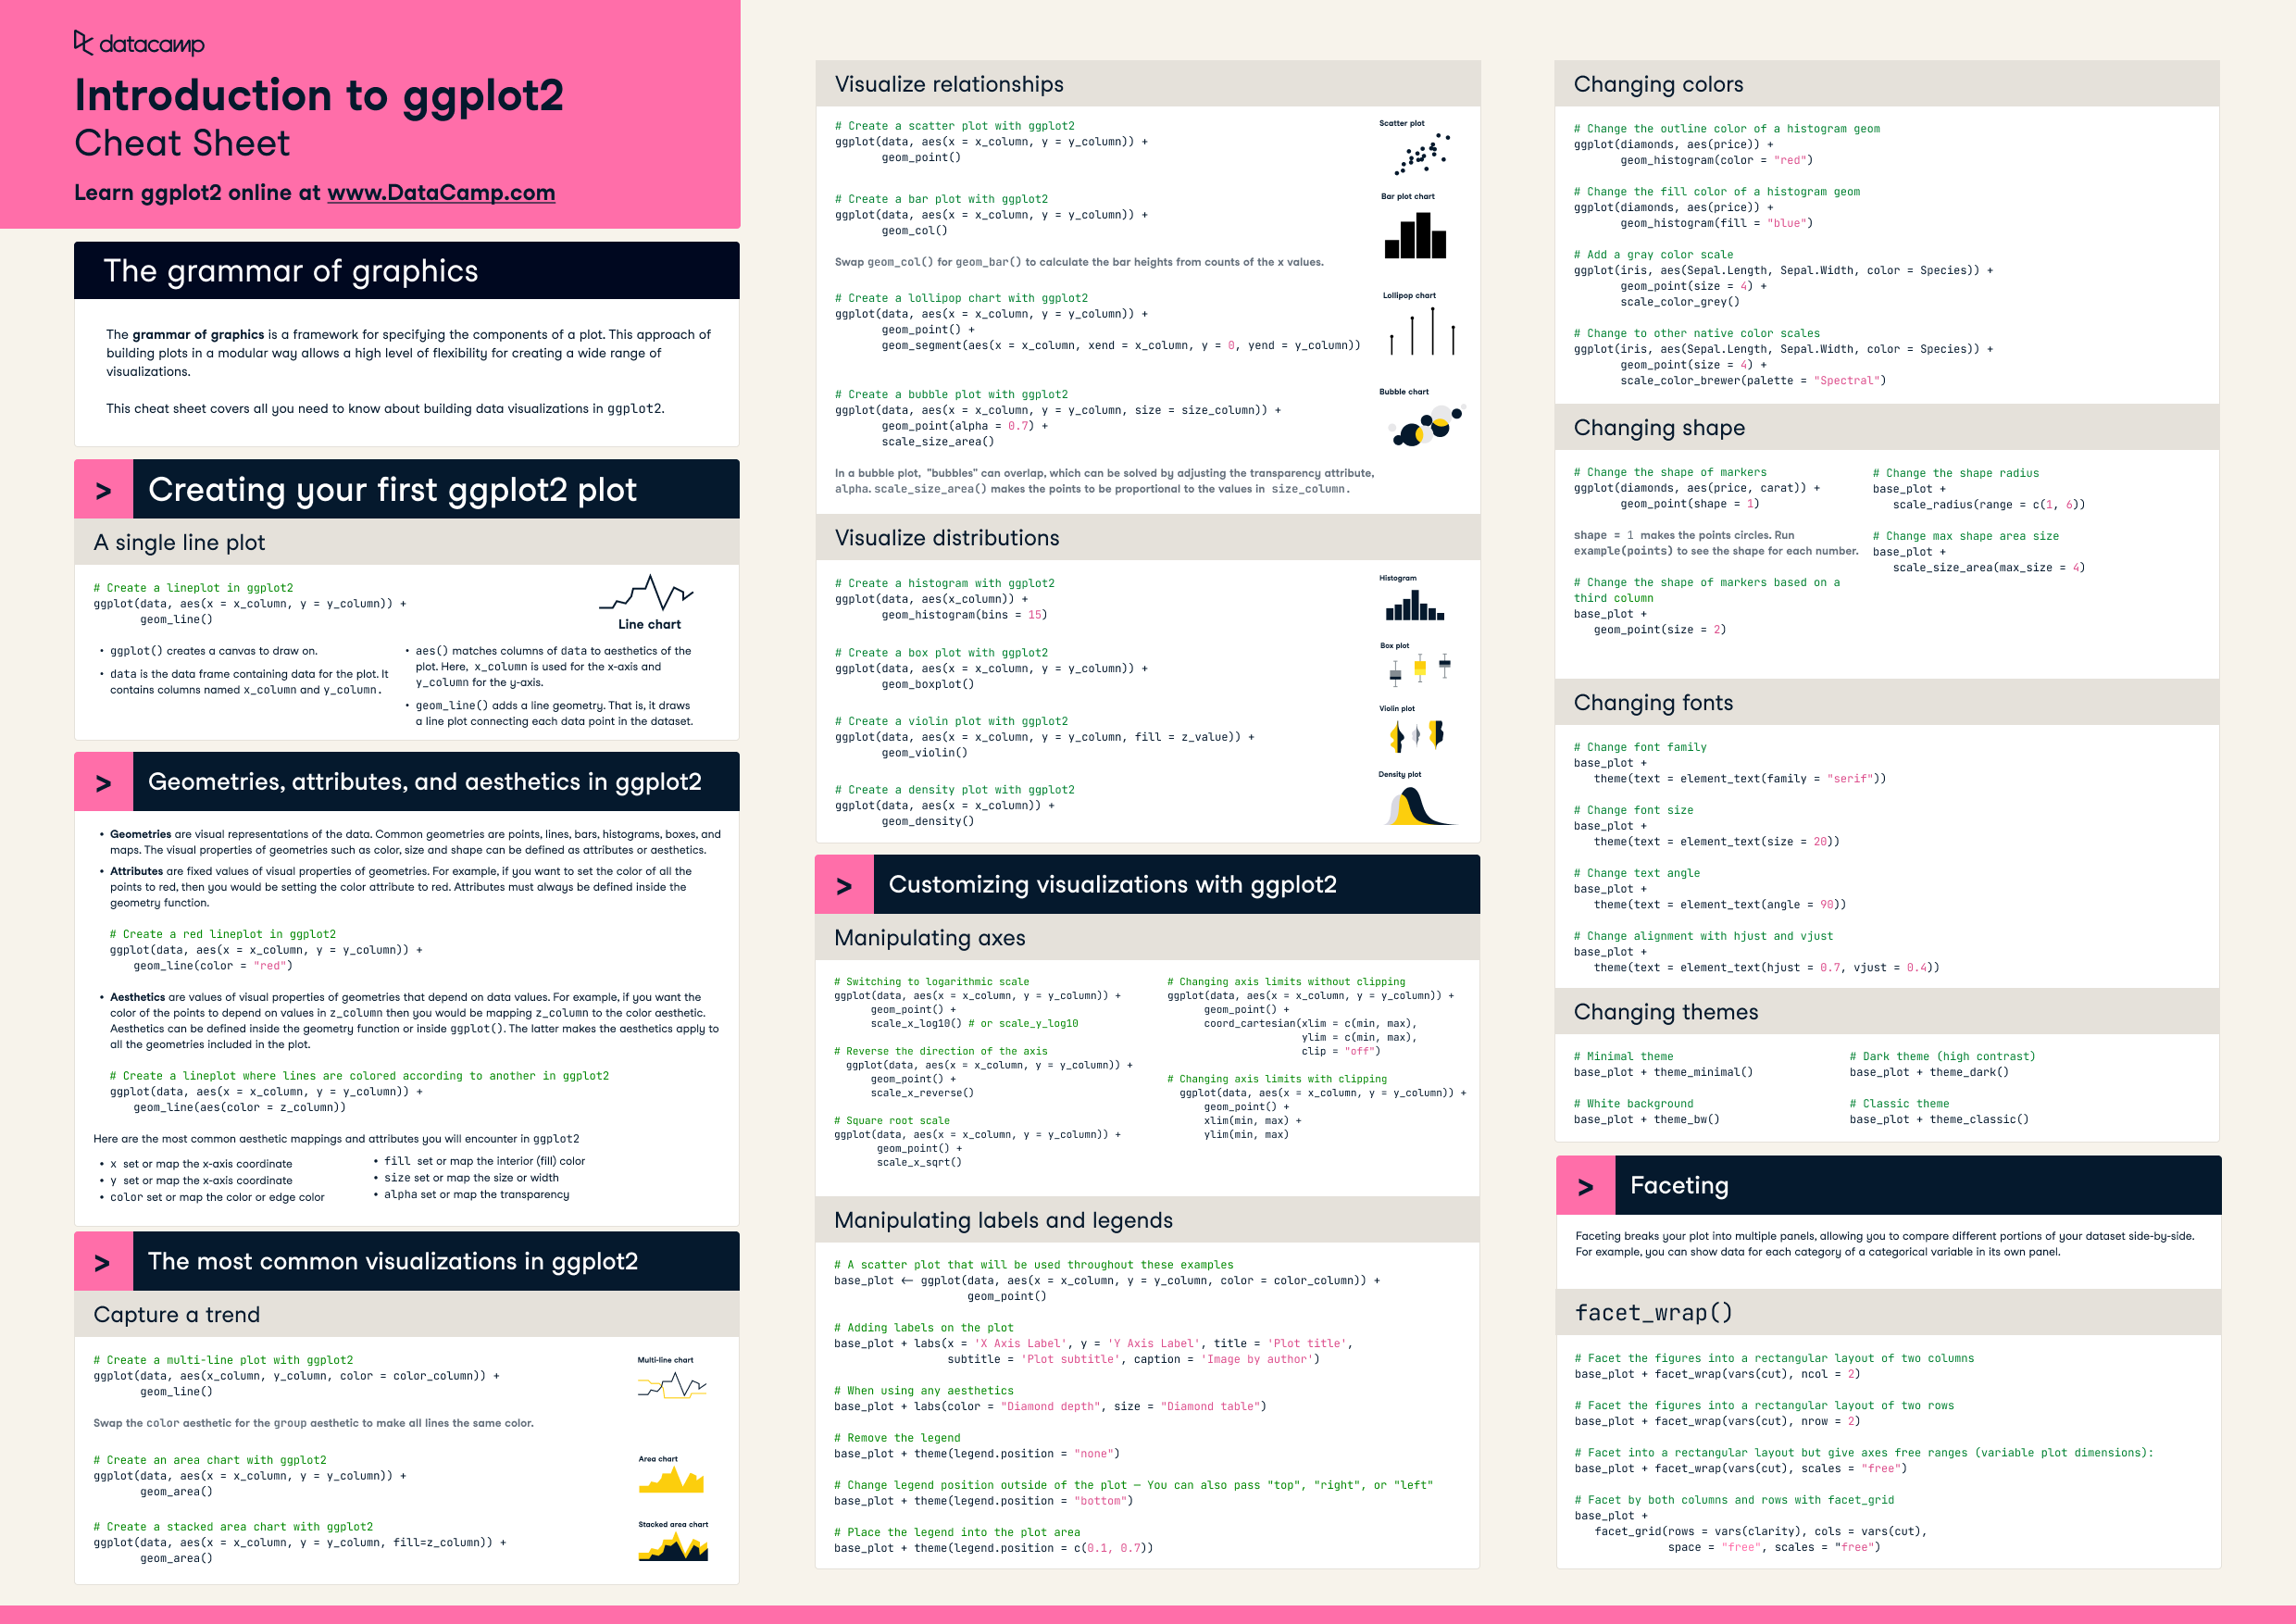
Ggplot2 Cheat Sheet: Your Ultimate Guide To Mastering Data Visualization
Hey there, data enthusiasts! If you're diving into the world of data visualization with ggplot2, you've come to the right place. Whether you're a beginner or an advanced user, having a solid ggplot2 cheat sheet can be a game-changer. This powerful tool in R is all about creating stunning, publication-ready graphics with minimal effort. Let’s dive right in and explore how ggplot2 can revolutionize your data storytelling journey!
Data visualization is no longer just about making charts; it’s about telling compelling stories through numbers. ggplot2 has been the go-to library for R users worldwide because of its flexibility and ease of use. With the right cheat sheet, you’ll unlock its full potential and create visuals that speak volumes.
This guide isn’t just another tutorial. It’s packed with practical tips, examples, and shortcuts to help you navigate ggplot2 like a pro. Stick around, and we’ll break down everything you need to know step by step. So, let’s get started!
- Subhashree Bathroom Video The Truth Behind The Controversy And Its Impact
- Zahn Mcclarnon Wife The Fascinating Life Behind The Scenes
Why Every Data Scientist Needs a Ggplot2 Cheat Sheet
First things first, why do we even need a cheat sheet? Well, ggplot2 is incredibly powerful, but it can also be overwhelming when you’re trying to remember all the syntax and options. A cheat sheet acts as your personal assistant, ensuring you don’t miss out on any cool features.
Here’s the deal: ggplot2 follows the grammar of graphics, meaning every plot is built layer by layer. You start with a dataset, define aesthetics (like x and y axes), and add layers (like points, lines, or bars). It’s intuitive once you get the hang of it, but having a cheat sheet makes the learning curve smoother.
With a cheat sheet in hand, you can:
- Why Veggamovies Is Your Ultimate Streaming Destination In 2023
- Mother Warmth Chapter 3 A Heartwarming Tale That Tugs At Your Heartstrings
- Quickly recall essential functions like
ggplot()andgeom_point(). - Customize your plots with ease using themes, scales, and labels.
- Save time by avoiding trial-and-error when experimenting with new features.
Understanding the Basics of Ggplot2
Before we dive into the cheat sheet, let’s take a moment to understand the basics. ggplot2 is built on the idea of the grammar of graphics, which means every plot is constructed systematically. Here’s a quick breakdown:
Data: The Foundation of Your Plot
Every ggplot2 plot begins with a dataset. Make sure your data is clean and well-structured. Missing values or incorrect formats can mess up your visualization.
Aesthetics: Defining the Visual Elements
Aesthetics (or aes) control how variables are mapped to visual properties like position, color, size, and shape. For example:
aes(x = variable1, y = variable2, color = variable3)
Layers: Adding Elements to Your Plot
Layers are where the magic happens. You can add points, lines, bars, and more using functions like geom_point(), geom_line(), and geom_bar().
Creating Your First Ggplot2 Plot
Ready to create your first plot? Here’s a simple example to get you started:
library(ggplot2)
ggplot(data = mtcars, aes(x = wt, y = mpg)) + geom_point()
In this example:
mtcarsis the dataset.wtis mapped to the x-axis, andmpgis mapped to the y-axis.geom_point()adds scatter points to the plot.
Ggplot2 Cheat Sheet: The Ultimate Reference
Now that you’ve got the basics down, let’s dive into the cheat sheet. Below is a comprehensive list of functions and tips to help you master ggplot2.
1. Customizing Aesthetics
Here are some common aesthetics you can customize:
xandy: Position on the axes.color: Color of points or lines.size: Size of points or lines.shape: Shape of points.
2. Adding Layers
Layers are where you define the type of plot. Here are some popular geom functions:
geom_point(): Scatter plot.geom_line(): Line plot.geom_bar(): Bar plot.geom_histogram(): Histogram.
3. Modifying Scales
Scales control how variables are mapped to visual properties. Here are a few examples:
scale_color_manual(): Manually set colors.scale_x_continuous(): Customize x-axis scale.scale_y_log10(): Use a logarithmic scale for the y-axis.
4. Enhancing Themes
Themes allow you to tweak the overall appearance of your plot. Some popular themes include:
theme_minimal(): Clean and simple.theme_classic(): Classic look with no grid lines.theme_void(): Blank canvas for custom designs.
Advanced Techniques in Ggplot2
Once you’ve mastered the basics, it’s time to level up your skills. Here are some advanced techniques to take your ggplot2 game to the next level:
Faceting: Creating Small Multiples
Faceting allows you to split your data into subplots based on a categorical variable. Use facet_wrap() or facet_grid() to create small multiples.
Annotations: Adding Labels and Text
Annotations help highlight important features in your plot. Use geom_text() or annotate() to add labels and text.
Extensions: Going Beyond Base Ggplot2
There are tons of ggplot2 extensions available to enhance your plots. Some popular ones include:
ggthemes: Additional themes for ggplot2.ggridges: Ridgeline plots for density visualization.gganimate: Create animated plots.
Tips and Tricks for Ggplot2 Mastery
Here are some additional tips to help you become a ggplot2 expert:
- Use
ggplotGrob()to inspect the structure of your plot. - Experiment with different color palettes using
scale_color_brewer(). - Save your plots as high-resolution images using
ggsave().
Real-World Applications of Ggplot2
Ggplot2 isn’t just for academics or researchers. It’s widely used in industries like finance, healthcare, and marketing. Here are a few real-world applications:
- Data analysts use ggplot2 to create dashboards and reports.
- Scientists rely on ggplot2 for publishing research papers.
- Businesses use ggplot2 for customer segmentation and trend analysis.
Conclusion: Your Journey to Ggplot2 Mastery
And there you have it—your ultimate guide to mastering ggplot2! With this cheat sheet in your toolkit, you’re ready to tackle any data visualization challenge. Remember, practice makes perfect, so don’t be afraid to experiment and push the limits of what you can create.
Got questions or feedback? Drop a comment below, and let’s chat! Also, don’t forget to share this guide with fellow data enthusiasts. Together, we can make data visualization more accessible and fun.
Table of Contents
- Why Every Data Scientist Needs a Ggplot2 Cheat Sheet
- Understanding the Basics of Ggplot2
- Creating Your First Ggplot2 Plot
- Ggplot2 Cheat Sheet: The Ultimate Reference
- Advanced Techniques in Ggplot2
- Tips and Tricks for Ggplot2 Mastery
- Real-World Applications of Ggplot2
- Conclusion: Your Journey to Ggplot2 Mastery
Article Recommendations
- Hdmovieshub 300 Your Ultimate Guide To Streaming And Downloading Movies
- Pinayflix The Ultimate Destination For Pinoy Entertainment


Detail Author:
- Name : Kathryne King
- Username : johnston.ashly
- Email : lindgren.malachi@yahoo.com
- Birthdate : 1987-10-12
- Address : 31615 Jade Neck Bereniceborough, NJ 18496-7461
- Phone : 430.512.9180
- Company : Hauck and Sons
- Job : Career Counselor
- Bio : Occaecati a et dolores cupiditate molestiae. Ullam commodi et ullam voluptates. Maiores accusamus facere est ipsa accusamus temporibus sed asperiores. Ut vitae quia ex nobis.
Socials
instagram:
- url : https://instagram.com/kendall.hills
- username : kendall.hills
- bio : Pariatur aut voluptatem dolor a. Voluptatem id sed voluptatem doloremque facilis ea quos.
- followers : 1581
- following : 2837
tiktok:
- url : https://tiktok.com/@hillsk
- username : hillsk
- bio : Iste qui numquam totam. Aut ut provident magni.
- followers : 2145
- following : 2353
facebook:
- url : https://facebook.com/hillsk
- username : hillsk
- bio : Excepturi consectetur quod illum repudiandae.
- followers : 2826
- following : 1385
twitter:
- url : https://twitter.com/kendallhills
- username : kendallhills
- bio : Unde maiores quaerat repudiandae deleniti. Nihil ut et rerum placeat. Ut et quibusdam consectetur quis hic.
- followers : 2180
- following : 2193